
Our game boards are now live on our Thinking Monk Studios website. We are starting prototypes for our next Kickstarter this month (August, 2017). If you would like more information on our next project, message us on our Facebook page and we may just decide to fill you in on what will be happening in the future.
Hello fellow board game lovers! I am here to share with you, a project my father and I have been working on for over almost a year now. If you want to check out our work, or get a board for yourself, visit our shop!
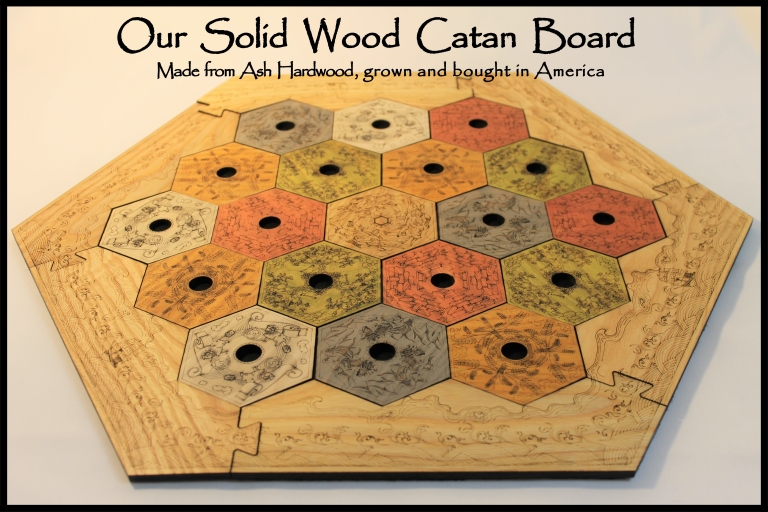
I am here, to share with you our journey from start, to near completion, of a one-of-a-kind, collectible laser-cut and engraved board, that can be used for games like Catan and made from 100% hard wood, absolutely no plywood junk. So please, read on and if you like what we have, please look back often for our Kickstarter and share us with your friends!
Links for Project:
Facebook (Like us and share to help out with stretch goals!)
Website/Shop (Looking for a gift for a friend or yourself? Check out our shop! More coming in July 2017!)
Instagram (Follow us and click that awesome heart button to help out with stretch goals!)
Etsy Shop – We run an etsy shop too for our products.
Hi-res photos of board near bottom of page!
Updates on Board are at bottom.
The Story
Day 1 (February, 2016):
I had just moved back from living in Taipei, Taiwan for 2 years. English had become more like Chinglish, and I got used to talking to people like they were a 5 year old due to my lack of fluently speaking Mandarin, and their lack of fluently speaking English. The sweet spot for communication norms for me landed somewhere in the middle. But boy was it fun. I digress.
There I am, visiting my parents, and my father wanted to show me the laser cutting machine at the University of Louisville in Kentucky. So we loaded up the car with some wood, and we set off towards what would become the start to the project of making the best board we could fathom up from our human brains. We both fell in love with laser cut. We are both designers of a sort at heart, my father is more the engineering type (having been an engineering dam near his whole adult life), and me, more of the art design type. Together, we both knew we could come up with a business that creates both function and beauty at the same time. Something we felt is lacking in the world of laser cutting today. Since we were both lovers of the game Settlers of Catan, we decided to start our own board. It started off as a simple project just for ourselves. We didn’t like any of the current boards that we had seen other’s make on the market, for one reason or another, so that can only mean making our own… logically.
NOTE: I will be uploading some of the old files soon! Prototypes we started with, etc. Check back to see the changes.
Day 2-14:
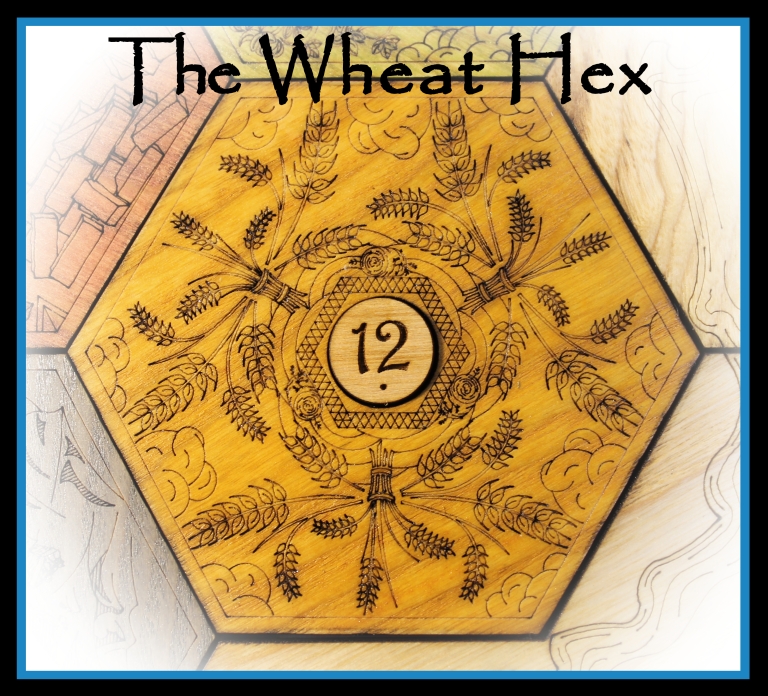
Cut to… I am a bit of a perfectionist… by the time I got done with the first prototype of the first resource (wheat), a week had gone by. But, we went back to the college, cut it out, and were super happy with it. Except at the time, the design I had come up with was in the middle of the hexagon, and when you cut out the hole for the pips. BAM! There goes half your image, ergo, half the work you put into the resource for nothing…
Yeah that wasn’t going to work. That was something I hated about the original game hexes. While they do look good, the pips take up the whole image.
So… I went back to the drawing board… for the wheat.
Day 15-60. By this point, i started working part time for my Aunt Cindy, and designing in my free time when I could. Since I didn’t have a place to set up my beefy desktop (and I have the worlds oldest clunk of an excuse as a laptop), I was not able to get done as much as I would have liked in this time. The key importance of this time-frame, was that we decided that we should try to see if we could come up with all 6 resources, and begin a Kickstarter for it when we finished, whenever that would be. So, I think by the time day 60 rolled around, I had a prototype for all of the resources, even water.
Day 61-160:
Now by day 61, I was living in New Zealand. I went there to start an Engineering degree and, mostly, to see New Zealand for 6 months. Another country off my bucket list.
When I first moved to New Zealand, it was without my girlfriend as she was still waiting for her visa, so when I wasn’t studying, I was working on our board. I would go to school, come home, study for 4 hours (math, bleh), and then work on the designs for 4-8 hours, sleep, repeat. That was my life for 3 months. By the end of day 160, I had over 5 prototypes for each resources, with various changes, and over 200 hours of design time in total on them.
The biggest problem was not coming up with a design. Anyone with some art abilities and a know how to use some computer software can do that. The trick was getting it to look good on paper AND on a piece of wood after being cut. The laser machine is not like a printer, where you click a button and it figures out how to make it look perfect all on its own. You have to program every line to cut at a different speed, or temperature (voltage), to get that line to look right. And since I was living in New Zealand, my father took on that role very well. While communicating long distance was rather frustrating, we were able to come up with the board and tweak all the lines needed to be tweaked, and figure out expenses, how we wanted them to be stained, etc. etc.
Day 161-180:
At this point, this is what you see before you. The (nearly 100% finished) board we designed. There is not a single image that is not 100% our own, nothing was copied and pasted. We have spent a lot of time and effort ensuring this board is something that we would love, and hope that you will too. I just recently moved back from New Zealand, and visited my folks again, and made all the necessary final adjustments to get the board where it needed to be. We were doing most of the prototype cutting on plywood, but by the end of the day it’s safe to say that plywood is not a very good quality product for doing this type of work. It warps easily, it’s brittle. Some of the details when etched into plywood make the wood chip away because, again, it’s just garbage. It works great for some things, but a highly detailed board is not one of them. We would never make a plywood board for ourselves and be happy, so why would we give other people a board that’s mediocre? We wouldn’t. So we decided we will only be making our board out of solid wood. Right now, that wood is the hardwood known as Ash. It’s great for laser engraving and cutting, and if properly stored you will have an amazing piece to show your gaming buddies for years to come.
Now:
We are now live on Kickstarter, and we want to share our journey and experiences with you. At the end of the day, all we want is a board that is of the best quality and looks amazing. We just hope that you will too!
Our plan for now, is to finish our Kickstarter for the current board, then move on to more board games.

A lot of people have come forward trying to do wooden board games for more than their initial game. Ultimately, a lot of them fail, or stop their project(s) for one reason or another. Myself, personally, from researching what I could, found that a lot of these projects put a lot of time into their first, initial project, then expected the next one to sell itself without much effort put into art design. That is not our plan. At all. Our plan is to make an amazing and beautiful product every time, and let the artwork, time and effort, show for itself rather than 1 successful campaign. Also, I love designing. If I could simply design board games for the rest of my life, that would be awesome. If I can only do it in my free time while working a real adult job, that would be awesome (albeit a bit slower). We even want to get into making our own board games, and helping others bring their board games to life. We are currently starting to make board game accessories too.
- Check out our –> Facebook and like us to receive updates on this and other projects we are working on, and to help out with stretch goals for our Kickstarter!
- Click to view our –> Kickstarter! We will be launching on the 21st of February 2017!
- Instagram? Yes we do! To help out with stretch goals be sure to follow us!
I would like to thank everyone that has been a tremendous help in this process, and to anyone willing to help us share our board with the world. Even just sharing us on your Facebook is more help than you could ever imagine, and we thank you greatly for it.
Below are the hi-res photo’s of the game pieces. They are rather big, so some scrolling skills will be required.
Hi-Resolution Photos
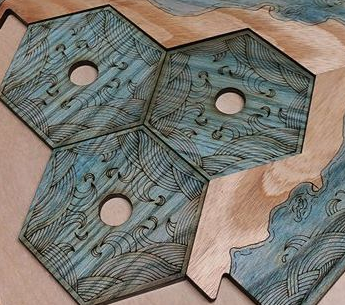
Below is a closeup of the edge pieces. I am still going to adjust a few more settings on the laser cutter to get a smoother more consistent cut line in some areas. Also, I may end up adding some shade lines for the area where the water meets the land, or even recess that down (by just adding a thin piece of wood cutout to that shape over top). More to come on that later.
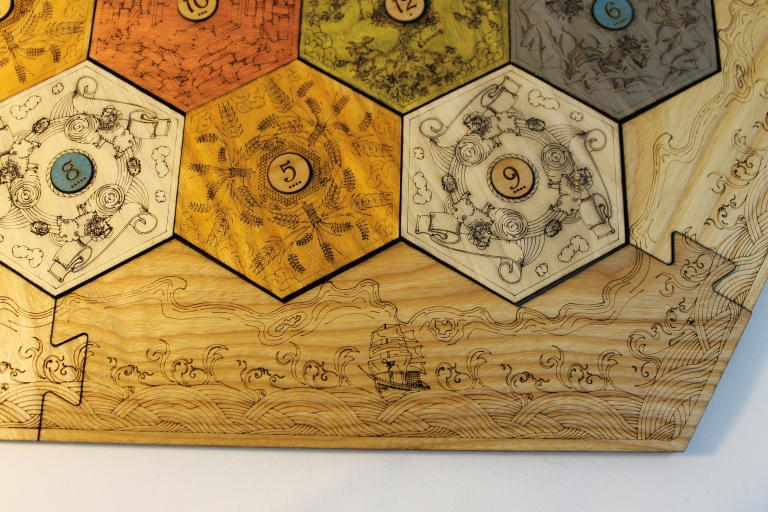
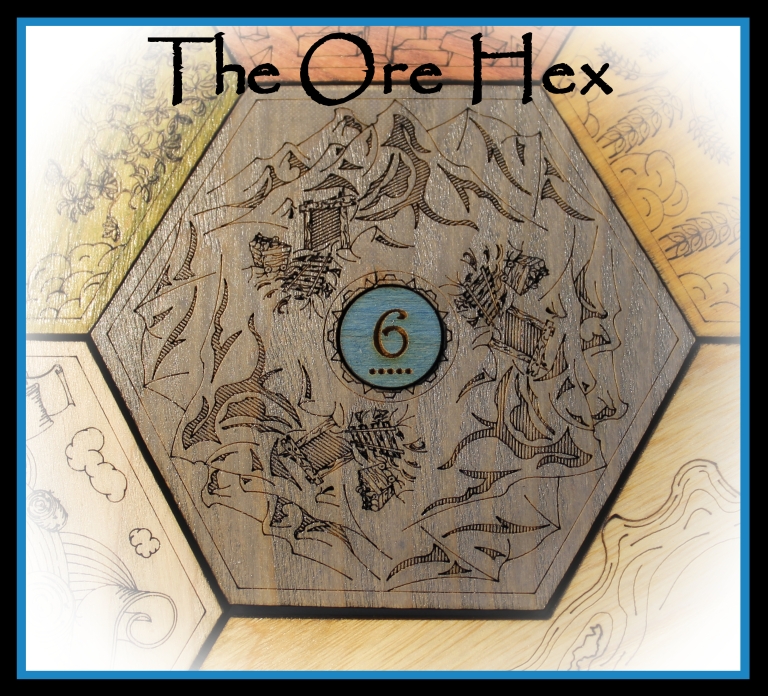
We also went with blue for the 6 and 8 pips. I think, however, we will be changing that. The next plan is to reverse the scan so that you are leaving the number a lighter color than the surrounding areas.
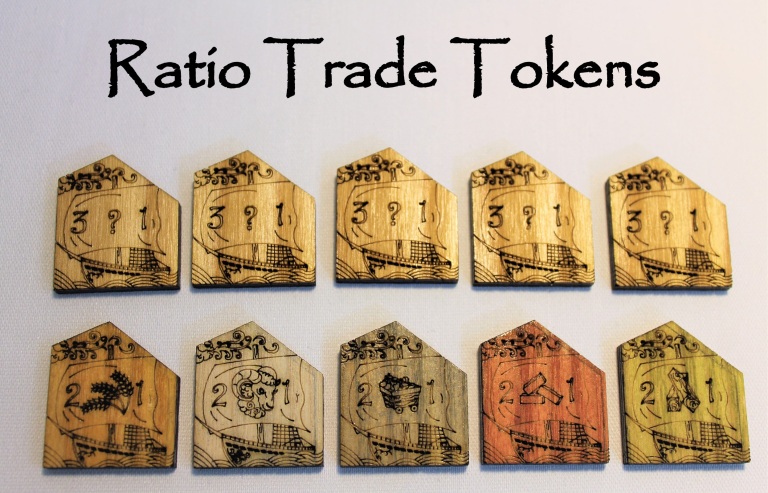
Below is a close-up of the ratio-trade tokens. They both function the same in my opinion, but some people like one style over the other, and it’s not that much harder to convert the images over to a little different size token.
This is the current robber. Our robber is currently… a prototype of prototypes. But still he functions fine. Update! March 7th, 2017: The robber is now going to be our logo (Thinking Monk). So that way you have a little monk guy running around stealing everyone’s resources! The way the robber works, is that the underside of the robber has a pocket in it so that he fits perfecting over the pips, without sliding around.

UPDATES!
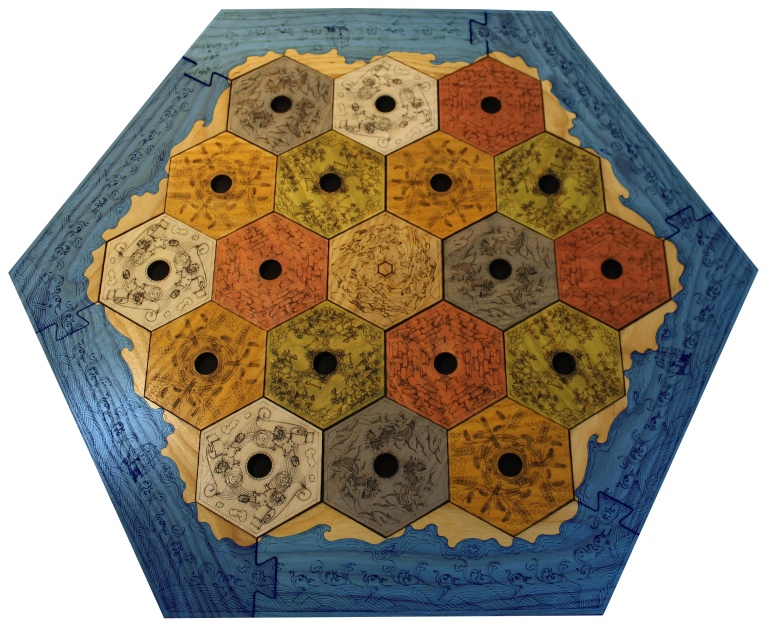
UPDATE, Feb 1, 2017: We played around with making the edge pieces blue, but it just doesn’t work as well as we want it too. The color itself is not terrible, but the design work does not show up very well at all on the blue, and if we tone down the amount of blue that goes into the wood, the color no longer looks good. UPDATE, Fed 16, 2017: We WILL in fact be making the edges blue. It will look a little different than the picture below, as that is from about 2 months ago, but we are determined now to make it happen, thanks to support from a lot of people telling us that they loved the blue so much it had to happen (over 95% of people like the blue out of over 100 votes!) I had to adjust some of the water details to make a little more room for land, so the land to water ratio (blue to non blue) will be a little different. Also, I got rid of some of the wave “splashes” and just added some more standard waves. I felt like the splashes I originally had were a little off balance with the rest of the water. My father as of the 16th of February, is rather sick, and since he is the one doing the laser cutting at the moment (I am 10 hours away), we will have to wait for him to get better. Hopefully he powers through it, chugs some nyquil and is better soon so you guys can see the difference! We will still be making BOTH the blue and non blue versions.
The edge peices are, in fact, laser engraved on this picture. But you can’t make it out. I have tried many, many ways to get it to show up better, but I am just not happy with it. I will keep attempting, as it really does liven up the board, but no promises. The other issue is that where the blue fades into the non-stained areas, it bleeds past the line. We tried to get around this by pre-cutting a deep line first, where the two colors offset, then staining, letting it dry, THEN laser cutting again. It still bled over. Even with tape. #tears.
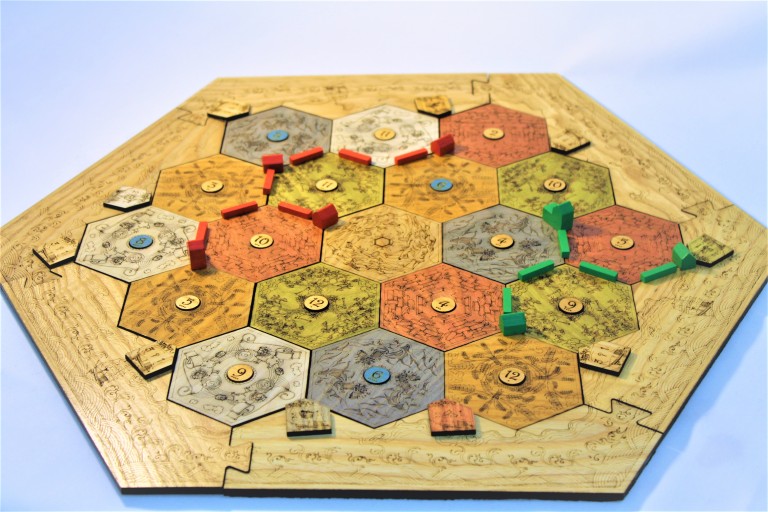
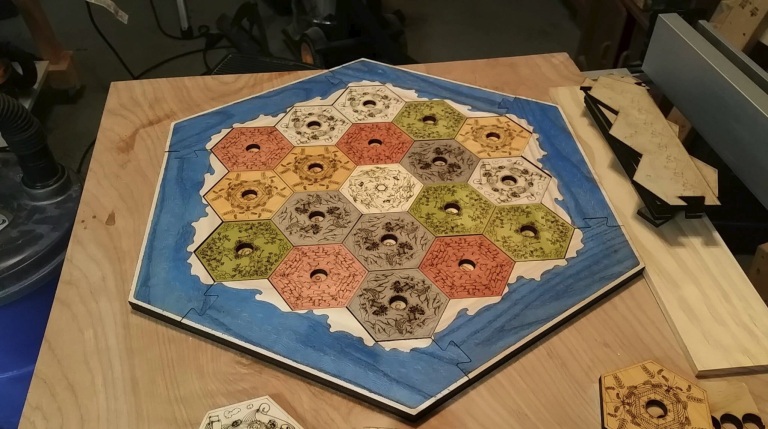
Update, March 7th, 2017: Here is the pictures for the pieces with the slots engraved out for the roads. This is an option on our Kickstarter! The end idea is to have an area for the settlements and cities to fit nicely into as well. These tests were done on plywood… so the end result would end up looking much nicer!


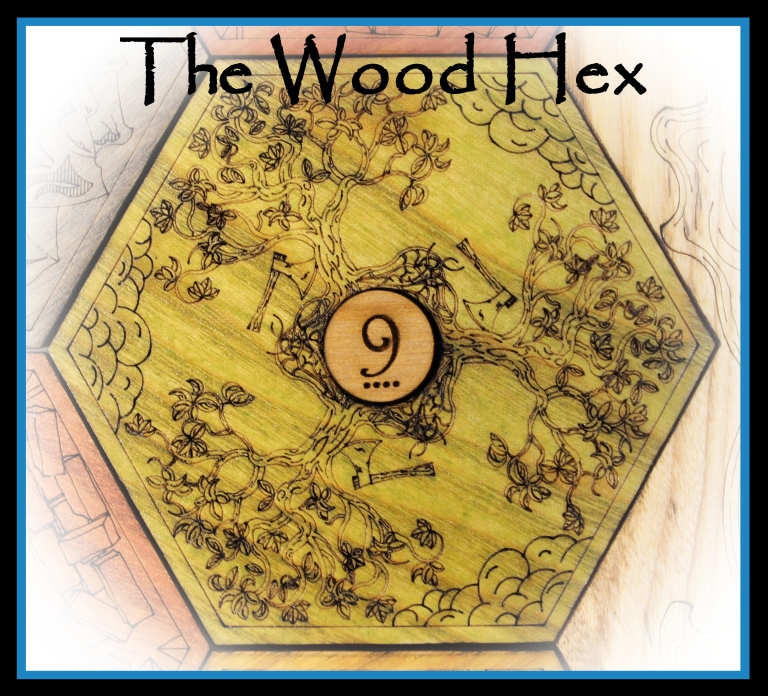
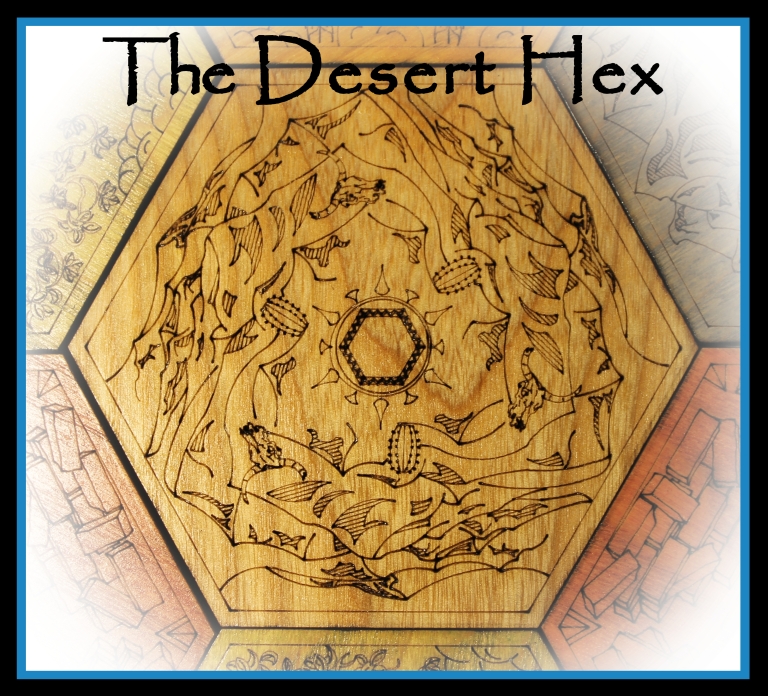
Update, March 7th, 2017: Here is the design of the sea hexagons that can be used for seafarers, or any game you need ocean hexagons for. I have been posting it all over our Facebook, haven’t had a chance to update my blog as I was in CO for business. Anyways, here is what we have so far. I am working on the gold hexagon today (hopefully I can finish), and I will post pictures once I have it done! Also, these hexagons have not been cleaned or had any shellac put on them (hence the dark areas in certain spots).
Update, March 10th, 2017: We decided we are going to be making boxes today. They will not be laser cut, but hand made, to insure that they are well made. Like everything else, we decided on hardwood, none of that crumby plywood. We are also going to make the 6 different colored cloth bags to hold the different players tokens in. *picture to come later*
Update, March 11th, 2017: We decided to continue pursuing this project, after our Kickstarter. Meaning, I am going to design the hexagons for all of the expansions, as well as other pieces that would be needed for the game. I will post the pictures of those as they get finished, of course, on this blog and my Facebook page. To give you an idea of how many pieces that is… currently we have designed a total of 8 hexagons, 4 edges pieces, 6 different harbor tokens, and the pips. From what I understand (and I know I am missing a lot still), there are at least 10 more hexagons to design, some fish pieces, a merchant… the barbarian tracker thingy… with the barbarian horde!… ship. So, I am excited! Because I love designing! I also am going to keep growing my hair longer. Not sure how this is relevant… but… I am technically a Marine with long hair, which makes me kind of like a bad-ass viking… which means I need an awesome axe… and one of those helmets with the horns sticking out of it, with a wooden shield with the Marine Corps logo painted on the front… yeah…
Where was I? Ah yes… hexagons and such. I will be designing lots of hexagons.
Update, March 23rd, 2017: We were successfully funded for our Kickstarter! We ended with a little over $18,000 in funding. Now on to production!
Production Updates
March 27th, 2017: We are still waiting for wood to arrive at this point. Theres over 500 lb’s a wood needed for this entire project, but it’s definitely a good feeling. We really can’t wait to start creating all these boards and boxes!
April 3rd-5th, 2017: The first shipment of wood arrived! We started by hand sanding the boards to a finishing feel (Drum sander still isn’t here yet). This took about 2 days worth of work, and a very, sore arm and hand 😀 After that we cleaned all the saw dust off the boards.
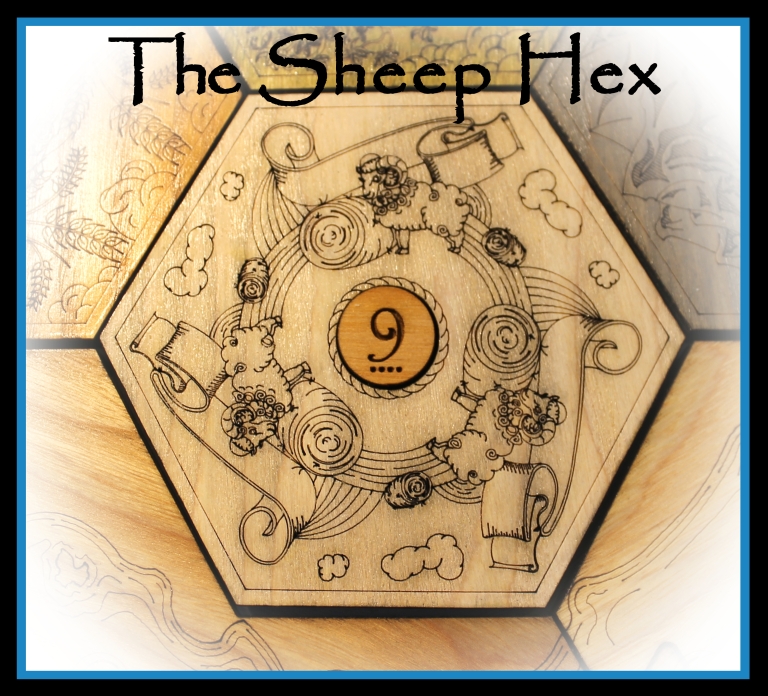
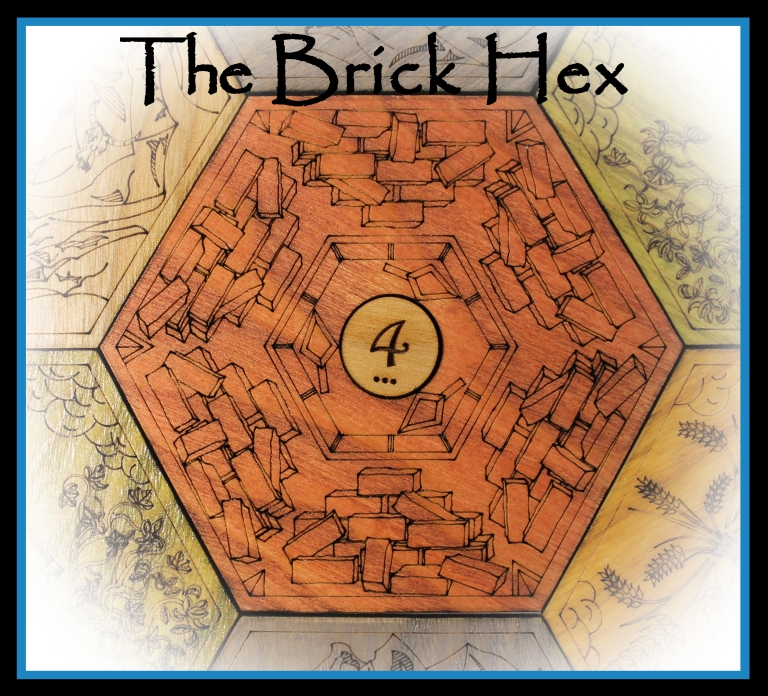
April 6th, 2017: We sorted all the boards by grain and color. Each resource hexagon is assigned a certain type of grain and color of wood. It’s all ash, but you get some dark, light, medium, mixed, and a medium dark color. We sorted into 6 total categories of wood, and a 7th “reject” pile. This rejects are perfectly fine, just not the grain pattern we are looking for, or there’s too much going on with it for the hexagons. The sheep is assigned the lightest wood as it’s being stained white, ore the medium, wood and brick are the dark and dark medium, the medium light color is going to wheat, and the mixed grain to the desert. We also started staining the boards this day, and got through all 50 boards for the brick that needed stained.
April 7th, 2017: We finished stained all the boards for wood, wheat, ore, sheep, and brick. Now we have to let them dry for 3 days to make sure the stain is set properly. This also helps normalize the wood so that they won’t warp. Too much change of humidity all at once can cause warping we don’t want. They are left in an inside environment (relative house temperature and humidity). This also helps them normalize to a household environment so that, again, they won’t warp once you receive them as they are already adjusted to a house. Once everything is done, the hexagons are then put back into a house environment for 2 weeks for the same reason.
April 8th, 2017: I was bored waiting for wood to dry. So I made adjustments needed for the edge pieces, and started working on the sea monster for the sea edge piece. Yes… there will be a sea monster on the edge piece that comes with sea. 🙂 The edge pieces now get cut into 3 pieces, the middle stained blue, then put back together using wood glue and a cam clamp my father, and partner in this venture, designed up. It works amazing!
April 9th, 2017: I started cutting all the brick (this was all stained on the 6th, where everything else was the 7th). I started cutting with the laser at 0830 and stopped at 2300. In between the laser time I cleaned the hexagons with denatured alcohol, put them in a clamp mechanism we created, and back into the house environment to await shellacing.
April 10th-17th, 2017: Next was the wood, then sheep, and we are currently finishing up cutting the ore hexagons. Last will be the wheat and desert, and we should be completely done with the normal board hexagons by Thursday! Which is way ahead of schedule.
April 18th, 2017: Finishing up the ore and starting the wheat tonight. All the other hexagons are cleaned up to this point. Once I finish the hexagons, I will be starting the edge pieces. They will take a long… time. We are estimating just under 2 weeks for those to all be finished. In between drying for those, we will be shellacing all the hexagons and normalizing them. I also design up a dice tray on Easter. We are going to be creating the tower to go with it, and those will be sold at a later date.
April 19th, 2017: The ore was finished last night around 2330. Started the wheat today. Should be done by late tonight or early tomorrow morning. Desert hexagon will be next, and should only take a few hours to finish them all, as there is not nearly as many to cut out. Also finished my dice tray. I lined it with leather, and raised the bottom up so it’s easier to see the dice. I started on the tower and got the frame done as well, and I am hoping to finish putting the little wooden bricks and walnut inlay on today. Also going to start putting shellac on the hexagons today. This process will take about a week total for all the hexagons and edge pieces since we are going to be doing it in small batches (about 200 at a time), then rotate them out of the clamping and drying process every day. After that, they stay in an inside environment till they ship out.
April 21st, 2017: The wheat is finished by this point. I have about 3 hours left of cutting for those, then they just need to be cleaned and get a few coats of shellac. I started the desert hexagon, and it should be done by the end of the day, as there is not as many of those to cut out.
April 22nd, 2017: Shellac coating… all day. All the hexagons are done, and I started cutting out the edges for the blue version. This one is cut into three pieces, the middle is dyed blue, then it’s glue back together, and clamped down. It takes about 20 minutes to make 1 blue edge at this point after averaging out making 30 of them, not including cut time. These will be done in small batches throughout the next 2 weeks, because I will go crazy if I try to sit down and do it all in 3 or 4 days.
April 23-28th, 2017: Nothing to new going on. We sold a board on our website we was awesome considering there’s no marketing going on. I also hired a good friend who got her degree in marketing to do our marketing for us, so she is joining the team 🙂 The edge pieces are coming along nicely, and there’s a lot of in between things happening. We set up the new router table for the boxes, which took way to long getting here, along with the fixtures for on the table. The pips are done. We got 222 of all of them (and accidentally cut 444 of 3 of them), so we have more pips than we should use in quite some time. Those took an entire 12 hour day.
April 29th, 2017: I took a much needed day off, and just had the laser running, did maybe an hour of shellac coating for some orders that need out on time crunches for events like weddings, etc. Then… then I took the day off.
April 30th, 2017: I continue my quest for the finishing of the blue edges. I am slowly slipping into madness. I dream of blue edges swarming my house and telling me, “we’re not done with you yet”…
May 1st, 2017: Blue edges. Robbers. Expansion edges finished. Need more coffee.
May 2nd-15th, 2017: Finished up All the blue edges, for the normal board, 5-6 player expansions, and the other expansions. Tomorrow I leave for California where my fiance got a job teaching Chinese. That gives me more time to dedicate to the company which is awesome! The bad news in these past two weeks, is that her father has pancreatic cancer. So we are moving the wedding up to the middle of June. A month away. Her parents will be staying with us for a few weeks starting June 3rd, so if I am not as active during that time, it’s because life happened for a bit, but I will be back.
May 16th, 2017: I hop in my car and begin my journey to the other side of the US. KY to CA is something like… a bajillion miles, so driving should be fun. I decided to drive to Iowa and stay at a friends house for a night and continue from there. First day down, not to bad. 9 hours total of driving today. Bring it tomorrow… bring it.
May 17th, 2017: I have found sleep to be illusive. Whatever, that jerk can shove off. I awoke at the ass crack of where the hell is the sun, packed up my car like an angry lover leaving from a long and what should have been a fruitful relationship, and headed off. Today the plan is to drive across 80 and get as far as I can before I get sleepy. I fell asleep at the wheel once in high school and got into an accident. Luckily no one was hurt but to this day I can’t even get tired when I am driving. So let’s see how far that gets me…
18 hours later I am in… Nevada. I think. No idea. 80 was closed because of a freak snow storm so I had to high tale it down to 76 and drive that way into a different storm. I made it through the Rockey’s a few hours before they shut down 76 as well. I have also found my limit. 18 hours. I can drive 18 hours and I start to get sleepy. Dam. Was hoping I could just balls to the wall the whole way. Oh well. 9 hours left. Now to get some sleep.
May 18th, 2017: 4 hours of mostly disturbed sleep seems to be enough. The only hotel nearby last night was a motel 8. Nope. So I slept in my car. At a fairly nice truck stop. Except greasy truckers kept staring at me like I was out of place. Maybe it was the tiny SUV in with the big trucks. Who knows. Anyways, time to finish this journey.
May 19th, 2017: I made it (yesterday), safely to CA. Surprisingly my back does not hurt as much as I thought it would. Still hurts, but it could be worst. Now for a day off and to get to fixing the house my fiance found for us. We get free rent for 2 months on the condition I do the painting and the floors. At 2300 a month, I will take that. Should take a week or 2 to finish. Anyways. I won’t be doing much for the business for a while, I need to focus on fixing the house, getting the shop set up, and preparing wedding, etc etc. I will tune back in when I get a wee bit settled.
June 13th, 2017: I don’t know if I am settled yet. But the walls are painted and the floors are done. So that’s a plus. This piece of shit house still needs a lot of work, but it’ll do for now. I made 2 dice towers in my wee bits of spare time allotted me by the gracious time lords. They turned out pretty nice. My father is finishing up (and is mostly finished) with all out Kickstarter pledges. He’s working on glasses now, then just a few more things and we should be all done. Once we finish, I will start a new blog for our new project 🙂 Which we have yet to decide exactly what it will be, but we are working on a few ideas. I will keep you posted after the wedding how everything is going!

June 27th, 2017: I had one backer who really wanted magnets for their board, to make it magnetic. They were willing to pay so I said sure. Well the magnet supplier I was working with… sucks to say the least. I am now having to go find a new supplier, and it’s hard to find the right size for this. Oh well. I shall prevail! The trophies are nearly done. I am waiting on a shipment from our KY office to finish the longest turn anti-trophy. Once that’s here they will be done fairly quick as well. My father… I believe just has glasses to finish at this point. Last I talked to him he was done with all the boxes and just needed to do those.
July 25th, 2017: Wedding complete. I am now a married man. My hair is also shoulder length. I am finishing up the magnet board this week as the magnets finally got here after trying 3 different companies. I also ordered prototype materials for our next kickstarter project. It’s gonna be awesome. It will be a board game accessory, that is all I will mention on this blog post about it. If you want updates on it, you can join our mailing list on our website, or follow us on our Facebook page.
Professional Photos (by the_review_board, on Instagram)


Disclaimer: We want to make wood boards for a lot of popular games out there right now. It’s important to note that we are not trying to take sales from these games. In fact, if anything, we hope to help sales of those board games. We do not plan on selling the full games, meaning you will still have to purchase the original board game, then you can buy our products. For anyone wondering about legality issues, we are doing nothing illegal. Again, if anything, what we are doing would only help sales for board game makers, not hinder them.


So I will totally back this project and buy a complete set if you can design the old style sea monsters(from old maps) into the sea tiles. That would be badass AF!!! I think this is a great idea and I think that would push me to order a full set with expansion haha! Even if the shipping is $20. Will the set come with a box or anything?
LikeLike
Hey Tyler! (That’s my name too). I know we talked on chat today, but just to make it more… concrete? I will definitely think about adding a sea monster to one of the edge pieces or a one of the sea hexagons we send out (not all of them, just 1). What it will come down to is if I can find the time between now and the end of the project when we start making these to design it up. If we get enough backers, I may just do it anyways as a thanks. 🙂
LikeLike
Was curious what slots for roads and settlements would look like, do you have any early designs or artwork? Anyway for backers to request additional designs on a hexes particular I would have coins / books / cloth for the cities and knights expansion? Very curious about magnetic board and how all that would work.
LikeLike
Hey Dayis!
I am going to put up a few pictures on this blog of the slots for roads, etc. The concept is that only the necessary spots would be engraved out, not the entire way around (like you will see in the pictures). As far as additional designs, that is unlikely to happen. Since you don’t need the coins, books and cloth on the hexes (each hex took around 30 hours to design and get right), that would be a costly move for us. We are working on the gold hexagon, since that is a necessity for seafarers. As far as the magnetic board would work… each side of the hexagon would have a small circular magnet put into a 1/16 wide hole. Every other side would have opposite poles. Same with the edge pieces. We would also place a magnet where the pip hole is, and the bottoms of the pips would have a magnet built into them as well. Same with the harbor tokens. We did one board like this a long time ago… and it takes forever. This is likely not going to be something we are going to do on the kickstarter (since it was the 100k stretch goal), but we might… very big might, sell 1 or 2 this way after the kickstarter. Prices will go up however, after the kickstarter is over. let me know if you have anymore questions!
LikeLike
That magnetic board would be an instant “here is my money” purchase for me. I figure you have stated this and I may have missed it, did you experience any warping of your custom designed catan hexes over time?
LikeLike
Hello again Dayis 🙂
The short answer to your second question, no. Any warping that has happened, happened within the first week. This was due to moisture changes because of stain, shellac, etc. which was easily fixed. After we make them in completion, they will not be shipped out till after a month, to ensure no more warping does happen, and if it does, it’s fixed. I have some hexagons that have been to 3 states already, (Kentucky, Iowa, and Colorado). They spent about 1 month in Kentucky (where they were made), 2 months in Iowa (where I currently live), and a week in Colorado (went there for business). In all of those locations, none of the hexagons or edge pieces warped. We are going to include instructions on how to un-warp them in the event they do warp, but the only way this would really happen is if 1) there is an very rapid climate shift/change of humidity, or 2) they are stored in someones broken down shed that has leaks.
For the magnetic board. I can see if my father is willing to stick it on the add-on sheet. But it’s not exactly a cheap process. I will see if he’s willing to price it out and I can get back to you on that at the very least. Let me know if you have any other questions in the meantime!
-Teejay
LikeLike
Can I suggest you don’t drill the holes for the pips all the way though and make the pips a little taller so they stick above the tile for easy removal? maybe 3/8″ or something, have to trial and error to see what would be ergonomic.
This will prevent the felt backing coming loose from a pip pushing though the felt backing. I think that would better than having a hole clean through the hex tiles like some kind of chinese coin.
LikeLike
Hey Eric,
You think like us! The pips are already going to stick above the hexagons for exactly that reason, easy removal. It may just be hard to tell from the pictures, plus we are making them a little thicker yet, I think the sweet spot was about 3/16, so just over 1/4. We went back and forth for a while about the hole going all the way through or not. In the end we decided that since felt was going to be on the back, that would act for the wood in place of it not falling through. Plus, 3/16 is great for some people, but what if you have big fingers? The felt lets you pop it out. There were actually some people too, when we did surveys, that preferred the hole went all the way through. The felt we are using is very dense allowing it to hold glue really well. Meaning, we are actually gluing the felt to the wood. I tried ripping the felt off the back of my prototype set, and even tried pushing my finger through the pip hole, the felt barely even warped where the pip hole is, and that’s after being extremely rough with it. In other words, the felt doesn’t come off. The only way I was able to get it off was with a knife or by burning it off (I don’t recommend the burning option). This isn’t the felt you buy from a craft store that’s flimsy and you can pull apart with your hands. This is premium quality felt, and it’s really dense.
We may end up offering a version after our Kickstarter where the pip holes only go halfway or 3/4 of the way through the wood, but no promises there.
Thanks for the insights Eric! They are always extremely welcome. There’s always bound to be things we didn’t think through 🙂 We’d love for you to follow our future projects as well, as we can always use another keen eye on things.
-TeeJay
LikeLike
OK sounds good. I haven’t pulled the trigger on backing yet my I’m closer to making my decision.
LikeLike
With the box, is their a plan to expand it for expansion? Would love to see if you could get creative and have an addon to the box even though it may look “unique” or sell a bigger box preparing for other expansions? The logo looks amazing on the box. Any plans to make a Thinking Monk Robber like one inch or two inch figurine? Super excited and congrats on making it pass 10k, hope it keeps rolling.
LikeLike
There is a plan to do an even bigger box that will fit everything for all the expansions, but not for the current Kickstarter (we actually just talked about this today). We don’t know exactly how big that box would need to be, which is part of the problem, and it really wasn’t part of our initial plans, so we have a lot of thinking to do on it to figure it out. If you want a bigger box, my suggestion would be to wait a little on the box, as we will be coming out with the bigger one on our website as soon as possible. The other option is buying 2 of the boxes we are making. The next expansions we make, will be able to fit into the same size box. It’s up to you of course what you decide to do, but those are our plans. Hope this helps Dayis! And thanks for the kind words 🙂
P.S. The box on the kickstarter page is little lackluster in what we have in mind for the final product we will be giving to our backers.
-Teejay
LikeLike